Originally published : Thu, August 27, 2015 @ 5:35 PM
Updated : Wed, August 16, 2017 @ 9:42 PM
Stellaris® FISH is an RNA detection technology performed by means of in situ hybridization. This technology and all of the incredible applications it supports would not exist without a detection tool. The detector in this scenario is a fluorescence microscope.
The microscope is the single major limitation for scientists who are new to the Stellaris technology. The reason being – well, this is a new technology and fluorescence microscopes are not ordinary instruments found in every lab across the country. These are highly intricate, sensitive, and costly pieces of real estate that reside primarily in core laboratories to provide additional interrogation of biological systems through optics. With that said, every microscope system is unique. In other words, it’s not a packaged deal, but rather entirely customized. From the nuts and bolts of the hardware to the software that coordinates all your movements, every piece is different from one lab to the next. Streamlining a protocol for each and every combination of system imaginable would be impractical. So whether your lab uses Nikon, Leica, Olympus, Zeiss, or something else, this blog article is intended to share fundamental microscope requirements to help you obtain a great Stellaris image.
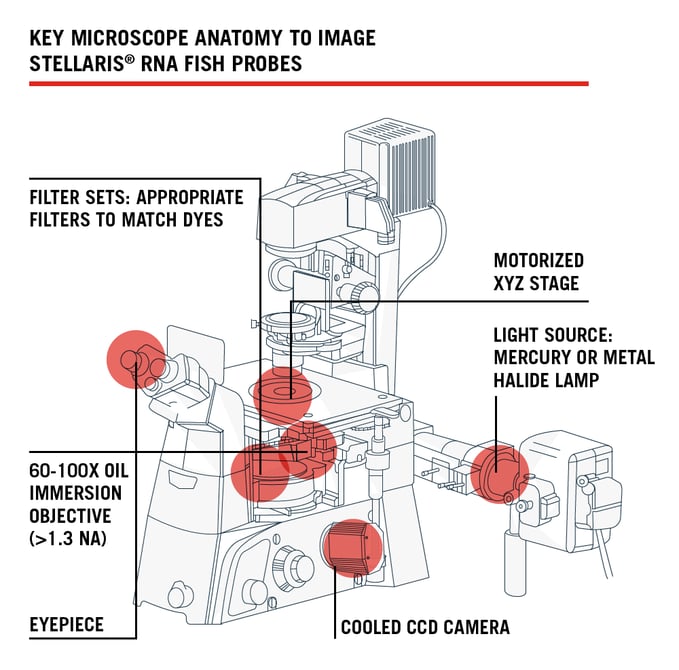
We understand, once your probes have finished hybridizing, you’re eager to image your Stellaris assay right away. But before we jump into imaging, which will be covered in a Part II portion of this blog series, here are 5 things you should know about your microscope hardware.
1. Use a Fluorescence Microscope
Although confocal microscopes are all the rage right now, we recommend novice microscopists to experiment with a wide-field fluorescence microscope first. In-house, we use a Nikon Eclipse Ti-E inverted microscope.2. Be Mindful of your Light Source
You need a strong light source - such as a mercury or metal-halide lamp. We use a Prior Lumen 200 metal halide. LEDs have come a long way in the past five years and some newer LED-based light sources can also work. We had the pleasure of demoing two LED light sources, CoolLED’s pE-4000 and the Lumencor SOLA light engine. Both LED light sources were successful for the detection of single molecules of RNA.
3. Secure a Cooled CCD Camera, Low-Light is Key
We recommend a standard cooled CCD camera – ideally optimized for low-light imaging rather than speed (13 µm pixel size or less is ideal). In-house we use an Andor Clara. An essential feature to know about your camera is its Quantum Efficiency (QE) (Fig. 1). QE is the measure of the effectiveness of an image sensor to produce a measurable electron signal from incoming photons1. The greater the number of photons converted into electrons by the camera for a given photon signal means a higher QE, which is better for imaging Stellaris. QE is an important feature to understand because it is wavelength-dependent.
Figure 1. Quantum Efficiency
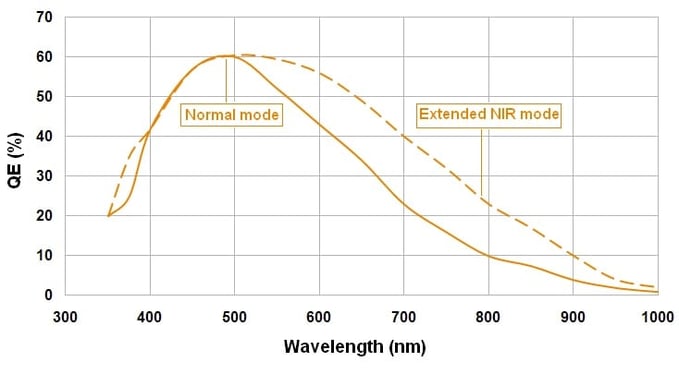
Take for example this QE curve that came from the specifications sheet of our Andor Clara camera. Quantum efficiency starts to drop as you move farther up the visible spectrum, past 600 nm. So say for instance, your camera has a QE of 33% near 650 nm. This means that for every 3 photons coming in, one electron is produced. This Andor Clara has an extended NIR mode that boosts the QE closer to 50%, which is advantageous for imaging our Quasar® 670 dye. It is worth checking if your camera has a similar capability. The take-home message is if you label your RNA target with a longer wavelength fluorophore and your camera has a low QE, the signal to noise value of your fluorescent RNA molecules are likely to be lower and harder to discern.
4. Acquire High Resolution Objectives...RNA is tiny!
You need a 60-100x oil-immersion objective with a high Numerical Aperture (NA) of 1.3 or greater. The quality of your Stellaris image depends on your NA and resolution. The resolution is your ability to distinguish fine details within your specimen, like the diffraction limited single molecule RNA spots. The numerical aperture of your microscope is a measure of its ability to gather light2. Higher values of numerical aperture allow for incidental rays of light to enter the front lens of the objective, which allows for a more resolved image so smaller structures can be visualized with clarity.
Our Nikon is equipped with a CFI Plan Apochromat λ 60x Oil NA 1.4. The Plan (planar) objectives are flat-field corrected, which means that the image you see in your field of view looks flat as opposed to curved. Each wavelength of light passing through the lens of a microscope refracts or “bends” at different angles such that the common focus point is slightly different for each color. Apochromatic lenses are corrected for chromatic and spherical aberration3. So, when you shine various wavelengths of light upon a specimen, the plane of focus remains just about the same for each. In general, most 60- 100x oil immersion objectives have a high NA, but that is not to say they don’t exist! This is worth double checking.
5. Find the Correct Filter Sets
After you’ve designed a Stellaris probe set capable of detecting your RNA of interest, you need to pick a dye (fluorophore) to serve as your label so you can find those RNA molecules under the microscope. Your fluorophore of choice must be compatible with the filter sets already equipped on your microscope. A simple way to check compatibility is to visit the company’s website whose filters you are using. An alternative is to purchase filter sets for the fluorophore you want to use.
Take a look at our Quasar 570 dye shown in Figure 2A. A filter capable of detecting this dye must have a similar absorption and emission spectra as seen in Figure 2B.
Figure 2A. Quasar 570 Absorption and Emission Spectra
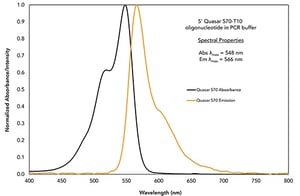
Figure 2B. Excitation and Emission Spectra of Chroma's SP102v1 Filter
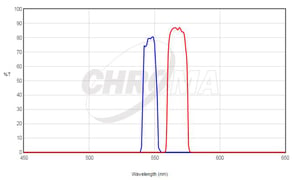
Our dyes are listed on Chroma’s website so overlaying these two graphs to make sure the spectral properties align with one another becomes rather easy! On the Chroma website, click the fluorochromes tab (to the right of the Legends tab) and search for your dye of interest, in this case Quasar 570. Once selected, click Reload Plot, and voilà!
Figure 2C. Overlay of Dye Spectra and the Filter Spectra
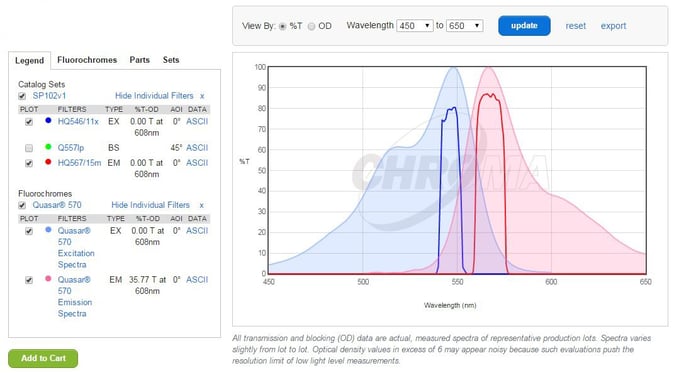
Quasar 570 has an absorption maximum at a wavelength of 548 nm and an emission maximum at 566 nm. As you can see, it aligns quite well with this filter from Chroma, and the absorption and emission wavelengths are well separated, preventing bleed-through into a neighboring channel.
Well there you have it! We hope this article helps you become more familiar with the microscope components needed to successfully image Stellaris RNA FISH probes. Keep an eye out for Part II of this series where we will go over tips on using software to capture and optimize your Stellaris images.
Now Up: Imaging Stellaris Assays Part II: How to Acquire Stunning Images
Imaging Stellaris Assays Part III: Creating Proessional, Publication-ready Images
References
- “Quantum Efficiency.” Photometrics Research Imaging Learning Zone: CCD Camera. Web
- “Numerical Aperture and Image Resolution.” Nikon MicroscopyU. Web
- “Introduction to Microscope Objectives.” Nikon MicroscopyU. Web

