Originally published : Thu, June 11, 2015 @ 7:47 PM
 Updated : Fri, November 13, 2015 @ 9:25 PM
Studying the expression level of RNA transcripts is often complicated by the fact that many DNA sequences are transcribed into multiple RNA isoforms. Or, in cases with microbes, each strain can represent a different sequence variant due to the frequency of mutations in these organisms. Despite these complications, it is still possible (in some, but not all, cases) to design a functional assay to detect multiple variants or isoforms of a gene or transcript. In other words, design one assay to specifically detect multiple targets. In this article, we will go over the basics of designing your assay to detect multiple transcripts at once.
Step 1: Find your sequences using NCBI
If you are novice at molecular techniques, the first thing you should do is familiarize yourself with a sequence repository, such as the National Center for Biotechnology Information (NCBI) website. This website, run by the National Institutes of Health, contains a number of public databases, but if you are interested in finding sequences, GenBank is the one you’ll typically be using. GenBank houses an annotated collection of all publicly available DNA sequences, allowing you to see the sequence structure of the genes, as well as the transcripts and proteins they encode. This database also has a wealth of other gene-related information, most of which goes beyond the topic of this article. It is important to note that although this database is constantly updated, it is not necessarily complete, as new sequences are being discovered and published on a regular basis. The information in the database represents our knowledge of the genome until this point in time, and some lesser-studied genes may not have well annotated sequences.
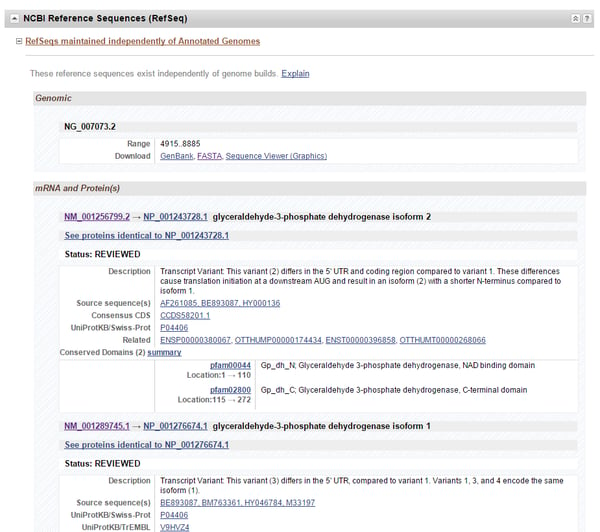
As an example, this article will demonstrate how to generate a consensus sequence using GAPDH, whose gene page can be found here. If you scroll down the gene page to the “NCBI Reference Sequence (RefSeq)” heading, you can see links to the gene sequence (denoted by the NG prefix), as well as each mRNA (prefix: NM) and protein (prefix: NP) sequence encoded by the gene (Figure 1). You can find a list of other accession number prefixes and their meanings here. With GAPDH, there are four different transcript variants encoding two protein isoforms. Thus, detection of total GAPDH mRNA in an assay requires design against all four variant sequences.
Figure 1. The GAPDH gene’s page. Under the “NCBI Reference Sequence (RefSeq)” heading is where each DNA, mRNA, and protein sequence for the gene can be found. Verified gene sequences can be identified by the prefix “NG”, mRNA sequences by “NM”, and protein sequences by “NP”. In this example, there are multiple mRNA (and thus protein) sequence variants encoded by the gene.
Step 2: Perform a sequence alignment
Once you have found all of your sequence variants, the next step is to perform a sequence alignment on these transcripts to generate a consensus sequence. There are a number of sequence alignment software available online, but personally, I use tools such as ClustalW2 which is maintained by the European Molecular Biology Laboratories (EMBL) and can analyze three or more sequences at a time.
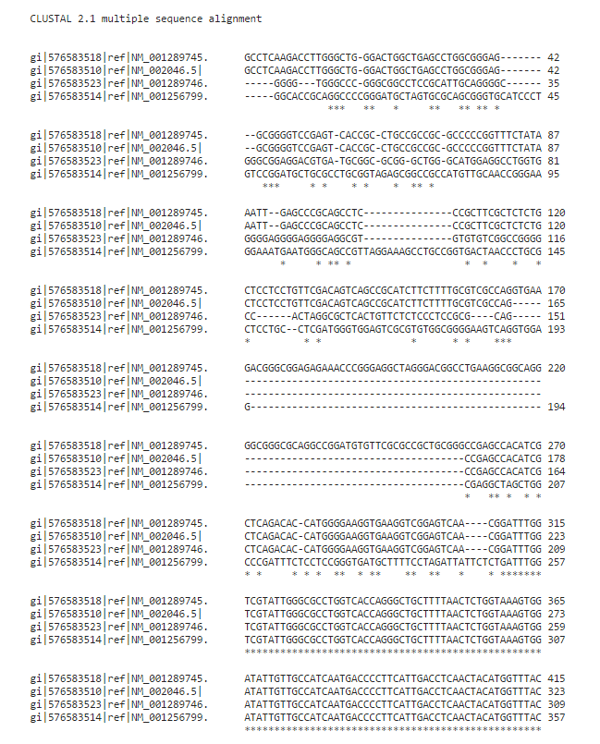
To run the alignment, simply paste each of the four mRNA sequences into the program (in any of these formats), ensuring that DNA is selected as the sequence type. Upon submission of the form, the software will align the sequences, displaying any homology across the variants with an asterisk, as shown in Figure 2. You can learn more about using this tool here.

Figure 2. After performing a sequence alignment with the four GAPDH transcript variants, the online software outputs the results as shown. Sites homologous across all sequences are denoted with an asterisk (*). Thus, as shown here, there are several deletions and mutations located in the upstream region of the sequence, but the sequences become homologous after the first few hundred bases. On the left side of each sequence is the sequence name. On the right side, the position of the last nucleotide in that line is shown.
Step 3: Identify regions of homology
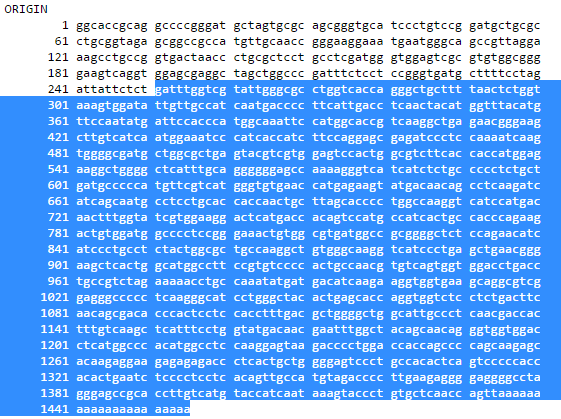
When generating your consensus sequence, you want to avoid regions in which there is very little homology, and rely upon using regions that are largely or entirely uniform across your variants. With GAPDH, it is only in the first few hundred nucleotides that there are any differences between the sequences (Figure 2). Thus, in order to obtain a consensus sequence, simply pick one of the transcripts (I picked variant 2: NM_001256799.2) and copy the latter end of the sequence that is common to all the transcripts, highlighted in Figure 3. You can use the numbers on the right side of each line in the alignment results (indicating the position of the last nucleotide in that line) as a guide to determine which nucleotides should be included in the consensus.
Figure 3. The sequence of NM_001256799.2 (GAPDH transcript variant 2) with the homologous region highlighted. Use the reference positions in the sequence alignment software as a guide when copying the homologous region from the selected variant. With this example, there is only a single chunk of homology, and thus the highlighted region can be entered directly into the desired software.
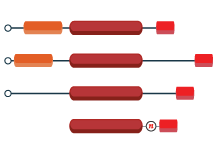
Finding the consensus sequence isn’t always as simple as this example. If there are multiple chunks of homology instead of just the one, they should each be included in consensus. As a placeholder, you can simply replace any non-homologous regions between these chunks with a single “N”, as shown in Figure 4. With many software, this will also prevent them from designing oligos that span across analogous regions.

Figure 4. Schematic displaying three different sequence variants and the resulting consensus sequence. The black lines correspond to regions of the sequence which vary amongst the three targets. Each box of the same size and color denotes a region of the sequence that is homologous across multiple variants. If one assay is required specific to all three, then only regions of the sequence which are common to all variants should be included in the final consensus sequence. Certain regions which are undesirable can be masked off from the software by including those regions as “N”, representing a base to be avoided in designs. Sometimes there is also ambiguity about the true identity of the base's sequence (brownish red region). This can easily be designed around by the inclusion of degenerate bases, replacing the standard base with the appropriate wobble base code.
Step 4: Identify single nucleotide polymorphisms
In some cases, especially in pathogen detection, you will come across homologous regions that contain sequence variations such as single nucleotide polymorphisms (SNPs), insertions, or deletions, also known as point mutations. If you come across SNP sites in your regions of homology, instead of replacing the site with an “N” as described above, replace the mutated site with the appropriate IUB Wobble base code. This will allow you visualize degeneracy amongst your sequences, without necessarily preventing the design of oligos complementary to that region of the transcript.
Voilà!
When designing an assay to detect multiple sequence variants, it only takes a few steps to identify a sequence that is common to all of them. Depending on your experimental design, you might even use this approach to exclude some variants from the consensus as well. Once you have identified your consensus sequence, simply copy it into the appropriate design program, such as RealTimeDesign™ software, and you can be certain that the assay generated will pick up all variations of your sequence. If your sequence contains wobbles, it is always better to avoid these bases when designing your assay if possible, but you can design oligos that contain wobble bases for more difficult targets. However, as more variants are involved, designing oligos able to detect all of them grows more complicated, and you might find that generation of a single consensus sequence is not possible, particularly when dealing with multiple strains of a microorganism.
Biosearch offers free, online probe design software for both qPCR and for Stellaris® RNA FISH. While there are additional design considerations specific to each application, generating a consensus sequence is the first step towards successful assay design. Check back for future articles on using these designers and on how to perform post-design bioinformatic analyses.


